
Cisco
Dans l’aide mémoire suivant, j’ai compilé les informations utiles sur l’usage du Cisco 2960G .
Les Cisco sont propulsé par un OS, monotache dérivé de la grande famille des Unix . Plus qu’un simple firmware, cet OS fonctionne dans la ram du switch avec des emplacements de stockages mort ( Rom ) et une décompression en Ram .
Le tout est écrit pour des processeurs de type Motorola .
Il faut donc avoir la même approche que pour un OS, plutôt que l’approche classique de la configuration d’un firmware .
A joutons à ça que pendant longtemps Cisco à crée les normes plus qu’il ne les a suivis et de ce passé, il reste certain écueil dans l’ergonomie ( on est en mode texte comme sous linux mais c’est plus proche de l’usage de vi que de nano … ) ou dans les fonctionnalités ( 2 normes pour le Vlan ( 801.2Q et ISL ) et des terminologies spécifiques à Cisco .
A retenir : il faut mettre à jour l’IOS d’un cisco pour bénéficier de nouvelles fonctions, du débuggage des anciennes . Donc toujours commencer par la .
La mise à jour de manière simple, ça signifie de lui donner un fichier TAR qui va contenir le firmware compressé . On obtient celui ci sur le site de Cisco une fois identifié avec un compte support . On va dans l’interface web ( ouf il y en a parfois ) et on lui donne le tar, il se débrouille . Si ça marche pas, il y a un système sur la mémoire de stockage des Cisco pour contenir plusieurs version des IOS, donc pas de panique il bootera sur une version de backup .
Notre ami au pays de cisco est le port série, accéssible en minicom ou autre logiciel d’émulation sériel VT100 .
C’est l’acces le plus complet à la ligne de commande . Il permet de reséter le mot de passe, changer de version d’IOS, ou récupérer un fichier de configuration .
Voici la doc Cisco pour reséter les 4 niveaux de mots de passe :
Step-by-Step Procedure
Follow the password recovery procedure below.
- Attach a terminal or PC with terminal emulation (for example, Hyper Terminal) to the console port of the switch.
Use the following terminal settings:
- Bits per second (baud): 9600
- Data bits: 8
- Parity: None
- Stop bits: 1
- Flow Control: Xon/Xoff
Note: For additional information on cabling and connecting a terminal to the console port, refer to Connecting a Terminal to the Console Port on Catalyst Switches.
- Unplug the power cable.
- Power the switch and bring it to the switch: prompt:
For 2900XL, 3500XL, 2940, 2950, 2960, 2970, 3550, 3560, and 3750 series switches, do this:
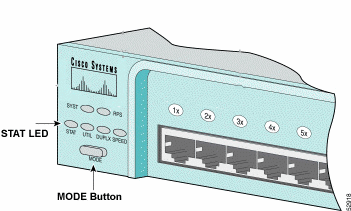
Hold down the mode button located on the left side of the front panel, while you reconnect the power cable to the switch.
| Catalyst Switch Series | LED Behavior and Mode Button Release Action |
|---|---|
| 2900XL, 3500XL, 3550 | Release the Mode button when the LED above Port1x goes out. |
| 2940, 2950 | Release the Mode button after approximately 5 seconds when the Status (STAT) LED goes out. When you release the Mode button, the SYST LED blinks amber. |
| 2960, 2970 | Release the Mode button when the SYST LED blinks amber and then turns solid green. When you release the Mode button, the SYST LED blinks green. |
| 3560, 3750 | Release the Mode button after approximately 15 seconds when the SYST LED turns solid green. When you release the Mode button, the SYST LED blinks green. |
- Note: LED position may vary slightly depending on the model.
Catalyst 3524XL

Catalyst 2950-24
For 2955 series switches only:
The Catalyst 2955 series switches do not use an external mode button for password recovery. Instead the switch boot loader uses the break-key detection to stop the automatic boot sequence for the password recovery purposes. The break sequence is determined by the terminal application and operating system used. Hyperterm running on Windows 2000 uses Ctrl + Break. On a workstation running UNIX, Ctrl-C is the break key. For more information, refer to Standard Break Key Sequence Combinations During Password Recovery.
The example below uses Hyperterm to break into switch: mode on a 2955.
<span style="font-family: Times New Roman,serif;"><span style="font-size: small;">C2955 Boot Loader (C2955-HBOOT-M) Version 12.1(0.0.514), CISCO DEVELOPMENT TEST</span></span>
<span style="font-family: Times New Roman,serif;"><span style="font-size: small;">VERSION</span></span>
<span style="font-family: Times New Roman,serif;"><span style="font-size: small;">Compiled Fri 13-Dec-02 17:38 by madison</span></span>
<span style="font-family: Times New Roman,serif;"><span style="font-size: small;">WS-C2955T-12 starting...</span></span>
<span style="font-family: Times New Roman,serif;"><span style="font-size: small;">Base ethernet MAC Address: 00:0b:be:b6:ee:00</span></span>
<span style="font-family: Times New Roman,serif;"><span style="font-size: small;">Xmodem file system is available.</span></span>
<span style="font-family: Times New Roman,serif;"><span style="font-size: small;">Initializing Flash...</span></span>
<span style="font-family: Times New Roman,serif;"><span style="font-size: small;">flashfs[0]: 19 files, 2 directories</span></span>
<span style="font-family: Times New Roman,serif;"><span style="font-size: small;">flashfs[0]: 0 orphaned files, 0 orphaned directories</span></span>
<span style="font-family: Times New Roman,serif;"><span style="font-size: small;">flashfs[0]: Total bytes: 7741440</span></span>
<span style="font-family: Times New Roman,serif;"><span style="font-size: small;">flashfs[0]: Bytes used: 4510720</span></span>
<span style="font-family: Times New Roman,serif;"><span style="font-size: small;">flashfs[0]: Bytes available: 3230720</span></span>
<span style="font-family: Times New Roman,serif;"><span style="font-size: small;">flashfs[0]: flashfs fsck took 7 seconds.</span></span>
<span style="font-family: Times New Roman,serif;"><span style="font-size: small;">...done initializing flash.</span></span>
<span style="font-family: Times New Roman,serif;"><span style="font-size: small;">Boot Sector Filesystem (bs:) installed, fsid: 3</span></span>
<span style="font-family: Times New Roman,serif;"><span style="font-size: small;">Parameter Block Filesystem (pb:) installed, fsid: 4</span></span>

<span style="font-family: Times New Roman,serif;"><span style="font-size: small;"><strong>*** The system will autoboot in 15 seconds ***</strong></span></span>
<span style="font-family: Times New Roman,serif;"><span style="font-size: small;"><strong>Send break character to prevent autobooting.</strong></span></span>

<span style="color: #0000ff;"><span style="font-family: Times New Roman,serif;"><span style="font-size: small;"><em>!--- Wait until you see this message before </em></span></span></span>
<span style="color: #0000ff;"><span style="font-family: Times New Roman,serif;"><span style="font-size: small;"><em>!--- you issue the break sequence.</em></span></span></span>
<span style="color: #0000ff;"><span style="font-family: Times New Roman,serif;"><span style="font-size: small;"><em>!--- Ctrl+Break is entered using Hyperterm.</em></span></span></span>

<span style="font-family: Times New Roman,serif;"><span style="font-size: small;">The system has been interrupted prior to initializing the flash file system to finish </span></span>
<span style="font-family: Times New Roman,serif;"><span style="font-size: small;">loading the operating system software:</span></span>

<span style="font-family: Times New Roman,serif;"><span style="font-size: small;">flash_init</span></span>
<span style="font-family: Times New Roman,serif;"><span style="font-size: small;">load_helper</span></span>
<span style="font-family: Times New Roman,serif;"><span style="font-size: small;">boot</span></span>
<span style="font-family: Times New Roman,serif;"><span style="font-size: small;">switch:</span></span>
- Issue the flash_init command.
<span style="font-family: Times New Roman,serif;"><span style="font-size: small;">switch: <strong>flash_init</strong></span></span>
<span style="font-family: Times New Roman,serif;"><span style="font-size: small;">Initializing Flash...</span></span>
<span style="font-family: Times New Roman,serif;"><span style="font-size: small;">flashfs[0]: 143 files, 4 directories</span></span>
<span style="font-family: Times New Roman,serif;"><span style="font-size: small;">flashfs[0]: 0 orphaned files, 0 orphaned directories</span></span>
<span style="font-family: Times New Roman,serif;"><span style="font-size: small;">flashfs[0]: Total bytes: 3612672</span></span>
<span style="font-family: Times New Roman,serif;"><span style="font-size: small;">flashfs[0]: Bytes used: 2729472</span></span>
<span style="font-family: Times New Roman,serif;"><span style="font-size: small;">flashfs[0]: Bytes available: 883200</span></span>
<span style="font-family: Times New Roman,serif;"><span style="font-size: small;">flashfs[0]: flashfs fsck took 86 seconds</span></span>
<span style="font-family: Times New Roman,serif;"><span style="font-size: small;">....done Initializing Flash.</span></span>
<span style="font-family: Times New Roman,serif;"><span style="font-size: small;">Boot Sector Filesystem (bs:) installed, fsid: 3</span></span>
<span style="font-family: Times New Roman,serif;"><span style="font-size: small;">Parameter Block Filesystem (pb:) installed, fsid: 4</span></span>
<span style="font-family: Times New Roman,serif;"><span style="font-size: small;">switch:</span></span>

<span style="color: #0000ff;"><span style="font-family: Times New Roman,serif;"><span style="font-size: small;"><em>!--- This output is from a 2900XL switch. Output from </em></span></span></span>
<span style="color: #0000ff;"><span style="font-family: Times New Roman,serif;"><span style="font-size: small;"><em>!--- other switches will vary slightly.</em></span></span></span>
- Issue the load_helper command.
<span style="font-family: Times New Roman,serif;"><span style="font-size: small;">switch: <strong>load_helper</strong></span></span>
<span style="font-family: Times New Roman,serif;"><span style="font-size: small;">switch:</span></span>
- Issue the dir flash: command.
Note: Make sure to type a colon « : » after the dir flash.
The switch file system is displayed:
<span style="font-family: Times New Roman,serif;"><span style="font-size: small;">switch: <strong>dir flash:</strong></span></span> <span style="font-family: Times New Roman,serif;"><span style="font-size: small;">Directory of flash:/</span></span> <span style="font-family: Times New Roman,serif;"><span style="font-size: small;">2 -rwx 1803357 <date> <strong>c3500xl-c3h2s-mz.120-5.WC7.bin</strong></span></span> <span style="color: #0000ff;"><span style="font-family: Times New Roman,serif;"><span style="font-size: small;"><em>!--- This is the current version of software.</em></span></span></span> <span style="font-family: Times New Roman,serif;"><span style="font-size: small;">4 -rwx 1131 <date> <strong>config.text</strong></span></span> <span style="color: #0000ff;"><span style="font-family: Times New Roman,serif;"><span style="font-size: small;"><em>!--- This is the configuration file.</em></span></span></span> <span style="font-family: Times New Roman,serif;"><span style="font-size: small;">5 -rwx 109 <date> info</span></span> <span style="font-family: Times New Roman,serif;"><span style="font-size: small;">6 -rwx 389 <date> env_vars</span></span> <span style="font-family: Times New Roman,serif;"><span style="font-size: small;">7 drwx 640 <date> html</span></span> <span style="font-family: Times New Roman,serif;"><span style="font-size: small;">18 -rwx 109 <date> info.ver</span></span> <span style="font-family: Times New Roman,serif;"><span style="font-size: small;">403968 bytes available (3208704 bytes used)</span></span> <span style="font-family: Times New Roman,serif;"><span style="font-size: small;">switch:</span></span> <span style="color: #0000ff;"><span style="font-family: Times New Roman,serif;"><span style="font-size: small;"><em>!--- This output is from a 3500XL switch. Output from </em></span></span></span> <span style="color: #0000ff;"><span style="font-family: Times New Roman,serif;"><span style="font-size: small;"><em>!--- other switches will vary slightly.</em></span></span></span>
- Type rename flash:config.text flash:config.old to rename the configuration file.
<span style="font-family: Times New Roman,serif;"><span style="font-size: small;">switch: <strong>rename flash:config.text flash:config.old</strong></span></span>
<span style="font-family: Times New Roman,serif;"><span style="font-size: small;">switch:</span></span>

<span style="color: #0000ff;"><span style="font-family: Times New Roman,serif;"><span style="font-size: small;"><em>!--- The <strong>config.text</strong> file contains the password </em></span></span></span>
<span style="color: #0000ff;"><span style="font-family: Times New Roman,serif;"><span style="font-size: small;"><em>!--- definition.</em></span></span></span>
- Issue the boot command to boot the system.
<span style="font-family: Times New Roman,serif;"><span style="font-size: small;">switch: <strong>boot</strong></span></span>
<span style="font-family: Times New Roman,serif;"><span style="font-size: small;">Loading "flash:c3500xl-c3h2s-mz.120-5.WC7.bin"...###############################</span></span>
<span style="font-family: Times New Roman,serif;"><span style="font-size: small;">################################################################################</span></span>
<span style="font-family: Times New Roman,serif;"><span style="font-size: small;">######################################################################</span></span>
<span style="font-family: Times New Roman,serif;"><span style="font-size: small;">File "flash:c3500xl-c3h2s-mz.120-5.WC7.bin" uncompressed and installed, entry po</span></span>
<span style="font-family: Times New Roman,serif;"><span style="font-size: small;">int: 0x3000</span></span>
<span style="font-family: Times New Roman,serif;"><span style="font-size: small;">executing...</span></span>

<span style="color: #0000ff;"><span style="font-family: Times New Roman,serif;"><span style="font-size: small;"><em>!--- Output suppressed.</em></span></span></span>
<span style="color: #0000ff;"><span style="font-family: Times New Roman,serif;"><span style="font-size: small;"><em>!--- This output is from a 3500XL switch. Output from other switches </em></span></span></span>
<span style="color: #0000ff;"><span style="font-family: Times New Roman,serif;"><span style="font-size: small;"><em>!--- will vary slightly.</em></span></span></span>
- Enter « n » at the prompt to abort the initial configuration dialog.
<span style="font-family: Times New Roman,serif;"><span style="font-size: small;">--- System Configuration Dialog ---</span></span> <span style="font-family: Times New Roman,serif;"><span style="font-size: small;">At any point you may enter a question mark '?' for help.</span></span> <span style="font-family: Times New Roman,serif;"><span style="font-size: small;">Use ctrl-c to abort configuration dialog at any prompt.</span></span> <span style="font-family: Times New Roman,serif;"><span style="font-size: small;">Default settings are in square brackets '[]'.</span></span> <span style="font-family: Times New Roman,serif;"><span style="font-size: small;">Continue with configuration dialog? [yes/no]: n </span></span> <span style="color: #0000ff;"><span style="font-family: Times New Roman,serif;"><span style="font-size: small;"><em>!--- Type "n" for no.</em></span></span></span> <span style="font-family: Times New Roman,serif;"><span style="font-size: small;">Press RETURN to get started.</span></span> <span style="color: #0000ff;"><span style="font-family: Times New Roman,serif;"><span style="font-size: small;"><em>!--- Press <strong>Return</strong> or <strong>Enter</strong>.</em></span></span></span> <span style="font-family: Times New Roman,serif;"><span style="font-size: small;">Switch></span></span> <span style="color: #0000ff;"><span style="font-family: Times New Roman,serif;"><span style="font-size: small;"><em>!--- The Switch> prompt is displayed.</em></span></span></span>
- At the switch prompt, type en to enter enable mode.
<span style="font-family: Times New Roman,serif;"><span style="font-size: small;">Switch><strong>en</strong></span></span> <span style="font-family: Times New Roman,serif;"><span style="font-size: small;">Switch#</span></span>
- Type rename flash:config.old flash:config.text to rename the configuration file with its original name.
<span style="font-family: Times New Roman,serif;"><span style="font-size: small;">Switch#<strong>rename flash:config.old flash:config.text</strong></span></span>
<span style="font-family: Times New Roman,serif;"><span style="font-size: small;">Destination filename [config.text] </span></span>

<span style="color: #0000ff;"><span style="font-family: Times New Roman,serif;"><span style="font-size: small;"><em>!--- Press <strong>Return</strong> or <strong>Enter</strong>.</em></span></span></span>

<span style="font-family: Times New Roman,serif;"><span style="font-size: small;">Switch#</span></span>
- Copy the configuration file into memory.
<span style="font-family: Times New Roman,serif;"><span style="font-size: small;">Switch#<strong>copy flash:config.text system:running-config</strong></span></span>
<span style="font-family: Times New Roman,serif;"><span style="font-size: small;">Destination filename [running-config]? </span></span>

<span style="color: #0000ff;"><span style="font-family: Times New Roman,serif;"><span style="font-size: small;"><em>!--- Press <strong>Return</strong> or <strong>Enter</strong>.</em></span></span></span>

<span style="font-family: Times New Roman,serif;"><span style="font-size: small;">1131 bytes copied in 0.760 secs</span></span>
<span style="font-family: Times New Roman,serif;"><span style="font-size: small;">Sw1#</span></span>
The configuration file is now reloaded. - Overwrite the current passwords that you do not know. Choose a strong password with at least one capital letter, one number, and one special character.
Note: Overwrite the passwords which are necessary. You need not overwrite all of the mentioned passwords.
<span style="font-family: Times New Roman,serif;"><span style="font-size: small;">Sw1# <strong>conf t</strong></span></span> <span style="color: #0000ff;"><span style="font-family: Times New Roman,serif;"><span style="font-size: small;"><em>!--- To overwrite existing secret password</em></span></span></span> <span style="font-family: Times New Roman,serif;"><span style="font-size: small;">Sw1(config)#<strong>enable secret </strong><em><span style="font-weight: normal;"><new_secret_password></span></em></span></span> <span style="color: #0000ff;"><span style="font-family: Times New Roman,serif;"><span style="font-size: small;"><em>!--- To overwrite existing enable password</em></span></span></span> <span style="font-family: Times New Roman,serif;"><span style="font-size: small;">Sw1(config)#<strong>enable password </strong><em><span style="font-weight: normal;"><new_enable_password></span></em></span></span> <span style="color: #0000ff;"><span style="font-family: Times New Roman,serif;"><span style="font-size: small;"><em>!--- To overwrite existing vty password</em></span></span></span> <span style="font-family: Times New Roman,serif;"><span style="font-size: small;">Sw1(config)#<strong>line vty 0 15</strong></span></span> <span style="font-family: Times New Roman,serif;"><span style="font-size: small;">Sw1(config-line)#<strong>password </strong><em><span style="font-weight: normal;"><new_vty_password></span></em></span></span> <span style="font-family: Times New Roman,serif;"><span style="font-size: small;">Sw1(config-line)#<strong>login</strong></span></span> <span style="color: #0000ff;"><span style="font-family: Times New Roman,serif;"><span style="font-size: small;"><em>!--- To overwrite existing console password</em></span></span></span> <span style="font-family: Times New Roman,serif;"><span style="font-size: small;">Sw1(config-line)#<strong>line con 0</strong></span></span> <span style="font-family: Times New Roman,serif;"><span style="font-size: small;">Sw1(config-line)#<strong>password </strong><em><span style="font-weight: normal;"><new_console_password></span></em></span></span>
- Write the running configuration to the configuration file with the write memory command.
<span style="font-family: Times New Roman,serif;"><span style="font-size: small;">Sw1#<strong>write memory</strong></span></span>
<span style="font-family: Times New Roman,serif;"><span style="font-size: small;">Building configuration...</span></span>
<span style="font-family: Times New Roman,serif;"><span style="font-size: small;">[OK]</span></span>
<span style="font-family: Times New Roman,serif;"><span style="font-size: small;">Sw1#</span></span>
Pas passionnant mais bigrement éfficace . Du coup l’on fait connaissance avec l’interface ligne de commande et l’on regrette vite fait un bon SSH 😉
Pour l’interface Web, sur le cisco 2960G il se trouve sur l’ip 192.168.1.50 par defaut et permet surtout un monitoring de l’activité des switchs et de l’état technique des ports .
Revenons au sujet de la mission . Le Vlan tagging est une technique pour créer des sous reseau sur un réseau physique . On partage ainsi une structure simple en plusieurs structures virtuelle .
La norme est le 802.1Q nommé Vlan tagging, très bien implanté sous linux . En clair sur l’entète de la trame ethernet on a 4 bits de valeur pour y mettre un numéro . Toutes cartes reseau dans le monde y marque 1, donc on peut dire que tout lan est un vlan avec le numéro 1 . Le cisco est transporteur et marqueur de ces bits, la norme voulant de marquer de 1 à 255 .
Cette notion visualisée, l’on va retenir qu’il est donc possible d’associer chaque port du cisco à un vlan unique et de définir que ce vlan est le vlan par défaut ( en clair tout paquet qui arrive sur ce vlan sera marqué avec celui ci par le Cisco ), ce qui implique que de n’avoir rien à faire coté client . C’est beau la technique …
en ligne de commande ( Cli ou seriel )
ça donne :
#int fa0/1
Switch03(config-if)#switch acc VLAN 1
en clair je sélectionne le port 1 et lui donne le port Vlan 1
même chose à la main pour tout les ports car la commande de groupage de configuration à des ratés …
nous voici donc avec les Vlans, reste à en tirer partis .
Notion Cisco on parle de monitoring et de trunking .
Monitoring, Nicolas va apprécier c'est pour snorter .Trunking c'est la création d'une autoroute avec tout le trafic des Vlans dedans . Les 2 associé ont peut donc monitorer l'ensemble du trafic sur un port du Cisco .
Exemple par la pratique,
conf t
monitor session 1 source interface fastethernet 0/1
monitor session 1 destination interface fastethernet 0/24
on dit que le trafic du port 1 est monitoré sur le 24
monitor session 1 source interface vlan 1
monitor session 1 destination interface fastethernet 0/24
on monitor le vlan 1 vers le port 24
enfin le top on trunk l’ensemble :
interface GigabitEthernet1/0/3
switchport access vlan 1
switchport trunk encapsulation dot1q
switchport trunk native vlan 1
switchport trunk allowed vlan 2
switchport mode trunk
la on définis que les ports giga, sont sur le vlan 1 en norme 802.1Q, tout le trafic natif est le vlan1 mais on y passe aussi le vlan2, enfin on trunk .
Si on trunk sur le port que l'on monitor, tada on a tout le trafic du switch .
Pour bien comprendre voici la copie d'un tuto complémentaire à mes explications :
Cisco vlan trunk 802.1Q
Contents[hide] |
Les vlans sous Cisco
Le standard pour les Vlans est le 802.1Q qui est utilisé dans la majorité des architectures réseaux. Toutefois il existe une autre possibilité chez Cisco l’ISL.
L’ISL est actuellement en train de disparaitre sur les derniers IOS et il est donc fortement conseiller d’utiliser le standard 802.1Q.
Comprendre les Vlans
La création de VLans a pour but de segmenter un réseau en plusieurs sous réseaus virtuels. Cette segmentation permet d’offrir une sécurité entre les différents réseaux et de réduire le domaine de collision. Les Vlans ne peuvent communiquer entre eux sauf si ils sont routés.
Une des choses importantes est de savoir si l’on souhaite faire passer un Vlan ou plusieurs Vlans sur un média.
Terminologie
Chez cisco les termes sont un peu différent de chez les autres constructeurs. Lorsque l’on parle de faire passer un seul vlan sur un media, on va pour cela faire une configuration en mode access, ce qui veut dire UNTAGGED (la trame est ne comporte pas de tag 802.1Q). Dans le cas, ou l’on souhaite faire passer plusieurs réseaux privés sur un même média on crée un trunk, ce qui signifie TAGGED (la trame est taggé avec un entete 802.1Q).
Dans un trunk, on peut faire passer plusieurs Vlans. Cela est souvent le cas sur les liens backbones d’un réseau. En revanche vers un serveur les trames arrivent dans la majorité des cas non taggé. Cependant cela commence à changer avec les systèmes virtualisés sur les Blades par exemple ou plusieurs machines virtuelles dans des réseaux différents sont configurées. Dans ce cas les cartes Ethernets seront capables de gérer la norme 802.1Q et de détagger les trames.
Le mot trunk est utilisé pour dire que l’on fait passer plusieurs vlans sur un lien. De manière générale un trunk signifie un aggrégat de bande passante, ce qui est de l’Etherchannel chez cisco (802.1ad)
Configuration
Le mode access ou untagged
Dans cette partie, nous allons voir la configuration pour un lien non taggé.
Tout d’abord, il faut vérifier que vous avez créé le Vlan sur votre commutateur.
<span style="color: #000000;"><span style="font-family: Times New Roman,serif;"><span style="font-size: small;">sw1#show vlan</span></span></span>
Par défaut, il y a 4 vlans qui existent le 1, 1002, 1003, 1004 et 1005. Tous les ports sont dans le vlan 1 à la première configuration du switch.
Pour créer un nouveau Vlan, ici le 2:
<span style="color: #000000;"><span style="font-family: Times New Roman,serif;"><span style="font-size: small;">sw1#configure terminal</span></span></span>
<span style="color: #000000;"><span style="font-family: Times New Roman,serif;"><span style="font-size: small;">sw1(config)#vlan 2</span></span></span>
<span style="color: #000000;"><span style="font-family: Times New Roman,serif;"><span style="font-size: small;">sw1(config-vlan)#name test</span></span></span>
Configuration sur le port 0/1 du switch :
<span style="color: #000000;"><span style="font-family: Times New Roman,serif;"><span style="font-size: small;">int fa0/1</span></span></span>
<span style="color: #000000;"><span style="font-family: Times New Roman,serif;"><span style="font-size: small;">switchport mode access</span></span></span>
<span style="color: #000000;"><span style="font-family: Times New Roman,serif;"><span style="font-size: small;">switchport access vlan 2</span></span></span>
Le mode trunk ou tagged
Maintenant nous voulons faire passer plusieurs vlan sur un lien. Tout d’abord, il faut vérifier que les vlans soient créer sur les deux commutateurs. Si tout est ok, on peut mettre en place la configuration sur les ports :
<span style="color: #000000;"><span style="font-family: Times New Roman,serif;"><span style="font-size: small;">int fa0/1</span></span></span>
<span style="color: #000000;"><span style="font-family: Times New Roman,serif;"><span style="font-size: small;">switchport mode trunk</span></span></span>
Pour faire passer tout les vlans :
<span style="color: #000000;"><span style="font-family: Times New Roman,serif;"><span style="font-size: small;">switchport trunk allowed vlan all</span></span></span>
Faire passer deux vlans 4 et 6 :
<span style="color: #000000;"><span style="font-family: Times New Roman,serif;"><span style="font-size: small;">switchport trunk allowed vlan 4,6</span></span></span>
Une suite de vlans 1 à 6 :
<span style="color: #000000;"><span style="font-family: Times New Roman,serif;"><span style="font-size: small;">switchport trunk allowed vlan 1-6</span></span></span>
Attention lorsque vous ajoutez des vlans sur un lien, préférer la commande switchport trunk allowed vlan add <Num_Vlan>. Si vous utilisez la commande switchport trunk allowed vlan <num_Vlan>, alors tous ceux qui auront été configuré avant seront supprimés. Il ne restera que le dernier ajouté.
Sur des switchs qui font du niveau 3, il faut ajouter des commandes comme switchport. Cette dernière permet d’avoir accès au reste des commandes switchport. En ce qui concerne le trunk, il faut savoir parfois préciser le type d’encapsulation en ajoutant la commande : switchport trunk encapsulation dot1Q.